
Linking accounts has been one of the trends nowadays when it comes to various applications. It makes it easier for you to reach your friends and other contacts every time you use an app. The same thing happens when your Microsoft and Facebook accounts are linked to your Skype. However, sometimes our preferences changes and we don’t want synchronization of contacts. Good thing you can always unlink accounts anytime you want to.
Here’s a step-by-step instructions on how to unlink accounts in Skype.
Step 1: Log-in to your Skype.
Step 2: Click on the ‘Skype’ tab then select ‘Account’.
Step 3: The page takes time to load so just wait a few seconds. You will find a number of selections at the lower left. Now click on ‘Profile details’.
Step 4: A separate page will be loaded in your browser. Once your Profile page has been loaded, click on the left arrow beside ‘Profile’.
Step 5: Then select ‘Account Settings’ below Account details.
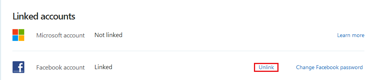
Step 6: The Account Settings page will show you whether your Microsoft or Facebook accounts are linked. To unlink, just click ‘Unlink’, then an information window will open. If you agree, select ‘Continue’ to proceed with the unlinking.
When the accounts are successfully unlinked, you will find a confirmation message at the top of the page.
For those of you who have purchased Skype products before linking your Skype to your Microsoft or Facebook account, you’ll have access to use them when you unlink accounts by logging in to Skype using the Skype account you purchased the products for.
Aside from linking or unlinking accounts to Skype, you can also use a Skype call recorder to enhance your Skype experience. Supertintin is recording tool that perfectly matches the way you do Skype conversations. Visit their website for more information on how to use and download.


